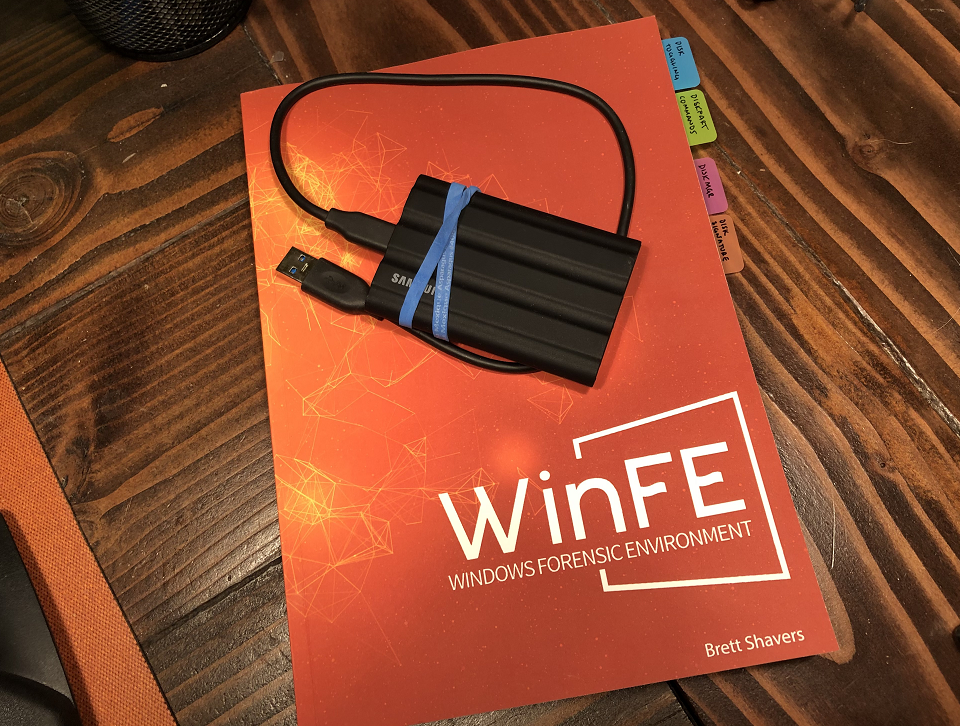
There is a two-part assessment in Brett Shavers’ 2023 offering of the Windows Forensic Environment (WinFE) course. Part one of the assessment requires participants to show two variations of WinFE, Misty’s Mini-WinFE and Colin Ramsden’s WinFE, were built for the class. The assessment also requires documentation that the builds’ write protect ability on an evidence drive were validated.
This post documents the validation process I used to test the two variations of WinFE built for the class. This was also an opportunity for me to better understand disk toggling in a WinFE build and the conditions in which it may, or will, write to a drive.
Understanding Disk Toggling with DiskPart
Aside from the registry modifications that make a Windows Preinstallation Environment (WinPE) a WinFE, Shavers notes in his book, Windows Forensic Environment, that disk toggling in DiskPart is “the core component of write protection in WinFE.”

In Windows Forensic Environment and Shavers’ WinFE course, he notes there are well-documented conditions in which disk toggling in WinFE:
- Will not write to a drive
- Will write to a drive
- May write to a drive
To elaborate when WinFE will or may write to a drive: WinFE will write to a drive when placing a VOLUME in READONLY; WinFE may write a disk signature when connecting a non-Windows drive. Shavers cites a comment by Troy Larson, creator of WinFE, that further explains that this “is well documented behavior of Windows, and, as such, is predicable.”
While DiskMgr or Protect.exe negates the need to use DiskPart exclusively to manage write protection in either Misty’s and Colin Ramsden’s WinFE builds, I wanted to observe these conditions to facilitate a deeper understanding how disk toggling may, or will, write to a drive using DiskPart. It will also better inform my observations as I validate that a WinFE build write protects an evidence drive.
Connecting a non-Windows drive to a Windows OS, Disk Signature
I used Misty’s Mini-WinFE to boot to a virtual machine environment with a new, blank, virtual disk created with VMWare Workstation 16 Pro (v. 16.2.5 build-20904516). The test I pursued resembles Misty’s Disk 1 disk signature check methodology. With the Mini-WinFE .iso (built with PEBakery) as the booting medium, Mini-WinFE will startup with DiskMgr (if selected in PEBakery or WinBuilder) and place the virtual disk Offline, Read-Only. However, because it is a blank disk (non-Windows) connecting to a Windows OS, I expect a disk signature will be written to the disk.
Using X-Ways Forensics installed with Mini-WinFE, a Windows disk signature is, indeed, observed at offset 0x1B8 to 0x1BB. This is consistent with Misty’s observation for the disk signature check on a “blank/empty disk image with all bytes set as 00.”
Repeating the same process, but booting to CAINE 13, the hex representation of the data on the blank disk does not include a disk signature at offset 0x1B8 to 0x1BB.


Placing a Volume in READONLY, Disk Marking
Mentioned previously, disk toggling with DiskPart in WinFE will write to a drive when placing a VOLUME in READONLY. My goal is to observe that mark.
Fortunately, ST83 on superuser.com provided a thorough summary where the VOLUME attribute for READONLY is stored on MBR disks. Consistent with that explanation, documentation from Microsoft states that Attribute Bits is an 8 byte field (64-bit value, little-endian) in the GUID Partition Entry that describe how the partition is used. Pertinent for my observation, the 60th bit marks a partition as READONLY.

Misty’s summary of Erwan Labalec’s DiskMgr indicates it manipulates DISK attributes, not VOLUME attributes. Misty writes that DiskMgr’s Read-Only button sets a “target DISK attribute to Read-Only, write protecting the disk and any volumes on it.”
To set up conditions necessary to observe the VOLUME attribute READONLY recorded on disk, I manipulated the DISK attribute using DiskMgr on a fresh virtual disk to Online, Read-Write. The disk was cleaned, then a partition was created with a size of 5000 MB. As DiskMgr does not manipulate the volume, I placed the VOLUME ONLINE with DiskPart, then performed a quick format with a FAT32 filesystem.
Before initiating the sequence demonstrated below, I used DiskMgr to place the DISK Offline, Read-Only. This is reflected with the detail disk command and volumes are not displayed.


Using DiskMgr to toggle the the DISK Online, Read-Only, it corresponds with changes observed with DiskPart’s detail disk command and a volume is displayed. Note that the VOLUME attribute is not “Read-only”.

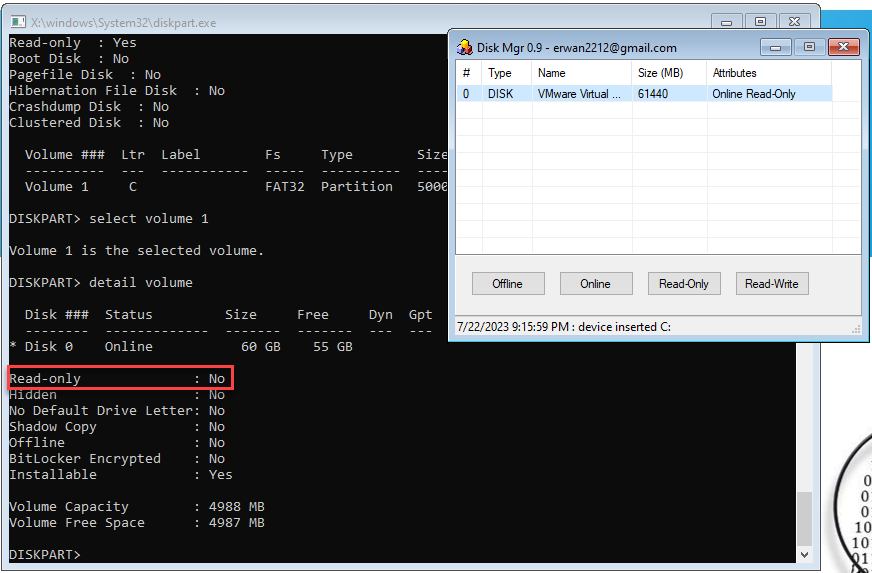

Using DiskMgr to toggle the DISK Online, Read-Write corresponds with changes observed with DiskPart’s detail disk command and a volume is displayed. Note that the VOLUME attribute remains as not “Read-only”.


After using DiskMgr to toggle the DISK Online, Read-Write, the VOLUME READONLY attribute at the offset where it is ordinarily record is not present. This is expected.

After toggling the VOLUME attribute to READONLY using DiskPart, the outcome is a partition GUID and the VOLUME attribute, READONLY, written to disk.

0x1000000000000000 indicates the partition is READONLYWhile the DISK attribute is in Read-Write mode, a mark on the disk that sets the VOLUME attribute to READONLY results in a failure to attempt to write an arbitrary text file to the drive letter.

From this experience, I learned it can be challenging to manage and track these attribute changes in DiskPart. I’m glad write protect tools like DiskMgr and Protect.exe exist.
Validating WinFE(s) as Write Protect Capable
To prepare for the validation process, the builds were loaded on a bootable Samsung 1TB T7 Shield drive: Misty’s Mini-WinFE build (v. 10.0.19041), and Colin Ramsden’s WinFE build (v. 10.0.19041) using ADK 2004 with the PE add-on. Each build uses Colin Ramsden’s write protect tool, Protect.exe.


| Tools in WinFE Builds | Misty’s Mini-WinFE | Colin Ramsden’s WinFE |
| Custom Wallpaper | Yes | Yes |
| LaunchBar | Yes | No |
| 7-Zip | 19.00 | 23.01 |
| F.A.U. | Yes | No |
| FTK Imager | 4.7.1.2 | 4.7.1.2 |
| HWiNFO | Yes (non-commercial) | No |
| IrfanView | Yes (non-commercial) | No |
| X-Ways Forensics | 20.8 SR-4 | 20.8 SR-4 |
| Notepad ++ | No | 8.5.4, portable |
| Protect.exe | Yes | Yes |
| WinMerge | No | 2.16.30.0, portable |
| SMART_Imaging Scripts | No | Yes |
WinFE Validation Process
I ran two series of tests on a single 128GB NVMe SSD. Before each test series and installation of an operating system, the NVMe SSD was wiped using the nvme format command while booted to CAINE 13. Using bootable installation media, Windows 10 21H2 and Ubuntu 22.04 LTS were installed on the NVMe SSD in a Lenovo x270 using an Intel x64 processor.
Using a similar approach I used in this post and an example Brett Shavers provided in class, I used the following steps:
| 1) | Wiped the NVMe SSD using CAINE 13. Powered off laptop. |
| 2) | Booted to installation media for Windows, installed Windows on the NVMe SSD, and generated user data. Powered laptop off. |
| 3) | Removed the NVMe SSD from the laptop. Housed the NVMe SSD in a Plugable USBC-NVME M.2 enclosure connected to DeepSpar’s USB Stabilizer with R-Studio T80+ (v. 9.1.191060) to ignore write commands, and attempted to write to the drive. A script was used to capture SMART information, image the drive with X-Ways Forensics (v. 20.8 SR-2), and to hash/verify. This acquisition established a control. |
| 4) | Installed the NVMe SSD back to the laptop. Booted to Mini-WinFE with the target drive online and read-only. After an attempt to write to the drive, the drive was imaged using X-Ways Forensics (v. 20.8 SR-4), and hashed/verified. Powered off the laptop. |
| 5) | Booted to Colin Ramsden’s WinFE build with the target drive online and read-only. After an attempt to write to the drive, a script was used to capture SMART information, image the drive using X-Ways Forensics (v. 20.8 SR-4), and hash/verify. Powered off the laptop. |
| 6) | Booted to CAINE 13 and mounted the target drive in read-only. After an attempt to write to the drive, the drive was imaged using GUYMAGER (v. 0.8.13) and hashed/verified. Powered off the laptop. |
Expected result using WinFE on a drive with a Windows OS: No change.
The steps above were repeated for a subsequent test, except an Ubuntu distribution was installed on the NVMe SSD.
Expected result using WinFE on a drive with an Ubuntu distribution: A disk signature may appear after booting to WinFE, but not likely.

WinFE Validation Results
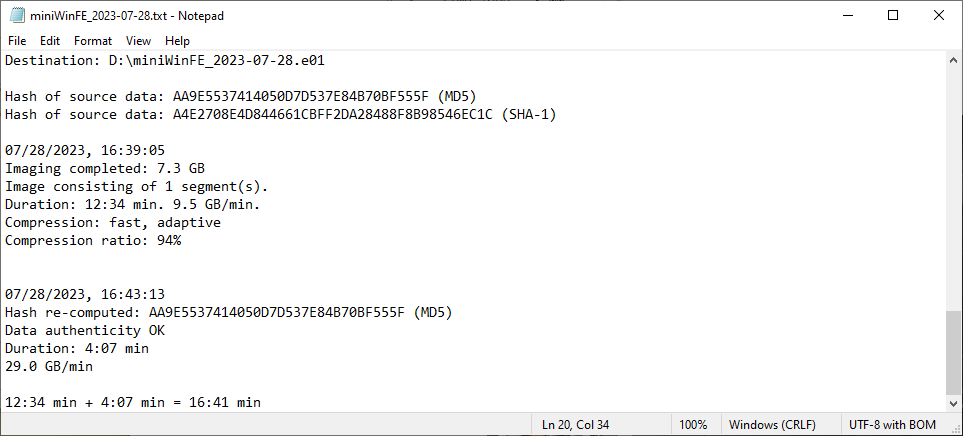
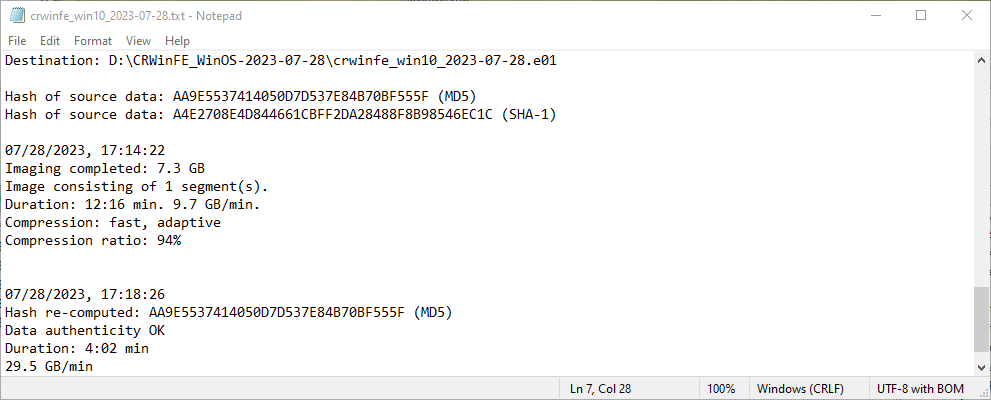
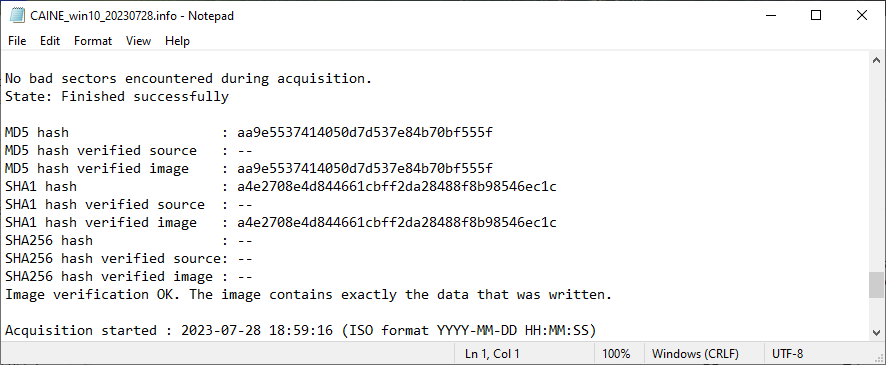
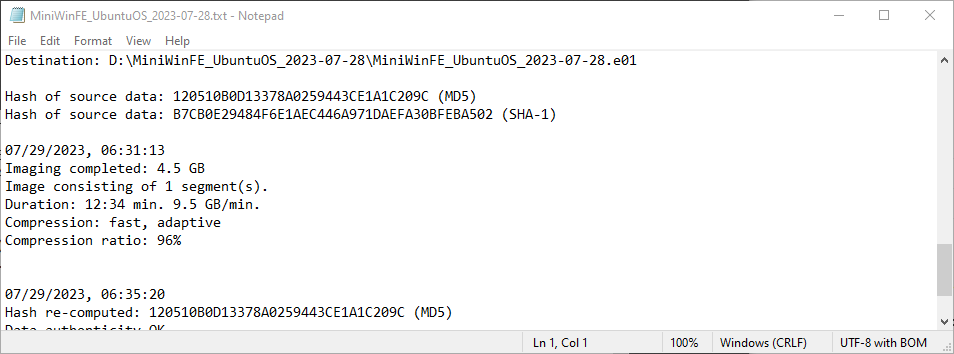
The MD5 and SHA-1 hashes calculated from the acquisitions collected using Misty’s Mini-WinFE and Colin Ramsden’s WinFE matches the control’s MD5 and SHA-1 hashes. Based on the conditions tested, the WinFEs built for Shavers’ class are capable of write protecting a target drive. The subsequent calculation of the MD5 and SHA-1 hashes for the acquisition collected using CAINE 13 corroborates this observation.
| Target Drive’s Operating System | Control MD5/SHA-1Hash | Mini-WinFE Hash Match? | CR-WinFE Hash Match? | CAINE 13 Hash Match? |
| Windows 10 | AA9E5537414050D7D537E84B70BF555F/ A4E2708E4D844661CBFF2DA28488F8B98546EC1C | Yes | Yes | Yes |
| Ubuntu | 120510B0D13378A0259443CE1A1C209C/ B7CB0E29484F6E1AEC446A971DAEFA30BFEBA502 | Yes | Yes | Yes |
Acquisition Information Files – Windows 10 OS Drive

Acquisition Information Files – Ubuntu Drive


SMART Information Collection with WinFE
I had an opportunity to tweak the SMART_Imaging script and use it for one of the WinFE builds. In a blog post, I described how I approached building the script here. In addition to providing another way to monitor write commands received from the host or data written to a drive, capturing SMART information before and after an acquisition, provides other data points of casual interest.
For example, I noted the temperature differences recorded for the NVMe installed in an enclosure versus in the Lenovo x270 with an NVMe caddy is about 11°C or 12°C. An experiment for another day is to test the temperature differences, before and after an acquisition, using various NVMe-USB enclosures.


Summary
Using Shavers’ WinFE course as a guide and structure for learning, I explored the conditions disk toggling in DiskPart may, or will, write to an evidence drive, and documented my process to validate the WinFEs built are capable of write protecting an evidence drive. I also made several updates to the SMART_Imaging batch script, which also works in Colin Ramsden’s WinFE build.
If you have an opportunity to take Brett Shavers’ recorded course, and you happen to use WinFE (or want to), please consider taking it. As Shavers mentioned in the class, “WinFE is not a silver bullet”, but when it is your only option, it becomes the best option. Completing a formal course from an instrumental developer of WinFE since 2008 is a solid opportunity to prepare for those few circumstances. Completing the course was time well-spent.

Leave a reply to Aseguramiento de Evidencia Digital con WinFE – FIS GROUP Cancel reply