
In a blog post I wrote about retrieving SMART information from NVMe SSD drives, I noted that Atola’s forensic imagers are able to capture SMART data before and after an acquisition.
While I don’t have a forensic imager with that capability, I adapted that idea into a workflow using the DeepSpar USB Stabilizer:
- Capture SMART information. Save output.
- Acquire forensic image of evidence drive.
- Capture SMART information. Save output.
- Compare the two outputs and document observation.
Summarized in this post, I assess how to use select tools to execute these individual steps from the command line. After assessing the workflow’s requirements and successfully verifying command line capability for each tool, I created batch files to automate these steps. The batch files executes this workflow using smartctl.exe, diskpart, X-Ways Forensics, and WinMerge. You may check it out on GitHub.
Capture SMART Information. Save Output.
When using smartctl.exe from the smartmontools package, it outputs SMART information to the console window.

Optionally, the results may be redirected to a text file using the > symbol with Windows Command Prompt or the Out-File cmdlet with Windows PowerShell. The output may also be structured in a JSON data format; more on that later.
#Using Command Prompt to execute smartctl.exe
smartctl.exe -a /dev/sdc > "D:\smart_check_standard_out.txt"

#Using PowerShell to execute smartctl.exe
.\smartctl.exe -a /dev/sdc | out-file "D:\smart_outfile_cmdlet.txt"
Acquire Forensic Image
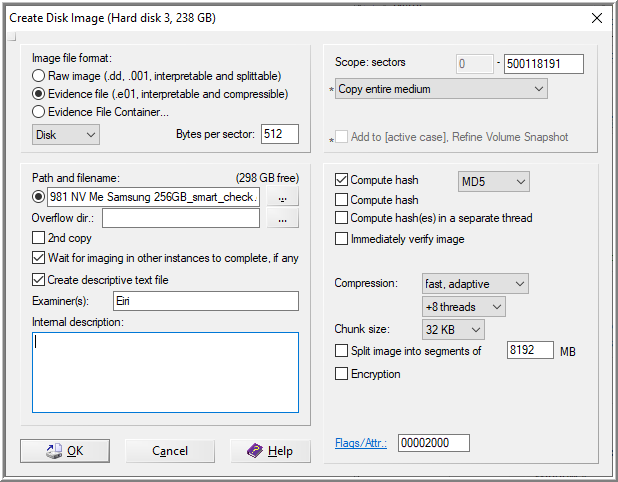
X-Ways Forensics and FTK Imager may be used to acquire an image of a drive. XWF supports both GUI and CLI commands. I believe FTK v3.1.1 is the last version that supports imaging via the command line.

Through my attempts to use XWF via the command line, I learned about acceptable syntax using Command Prompt and PowerShell. Searching the X-Ways Support Forum, I found a thread titled, “Imaging via CLI”, dated 2014-07-14. In the thread, Stefan Fleischmann noted Command Prompt will not like the syntax if typed as:
xwforensics64.exe :2 |e01|C:\testimage.e01My attempt was similar:
xwforensics64.exe :3|e01|D:\myimagename.e01|my description|derek eiri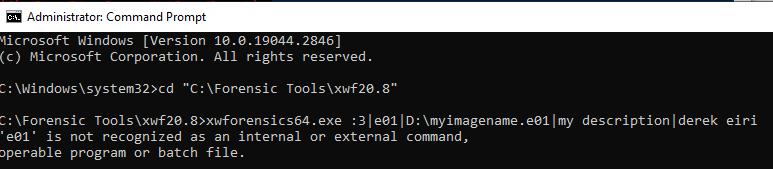
Fleischmann provided an example how the command would be accepted by Windows:
xwforensics64.exe ":2" "|e01|C:\testimage.e01"The command above executes xwforensics64.exe. The first parameter, :2, opens the second disk, according to Windows. The second parameter starts with a pipe, followed by the image format (e01 or raw), a pipe, and the path and filename of the image. Optionally, another pipe, a description, a final pipe, and an examiner name may be included. A final parameter, auto, may be added to automatically close XWF when imaging is complete.
Each parameter must be delimited with a space. The second parameter is quoted to be recognized as a string. Otherwise, the pipe will be interpreted by Command Prompt or PowerShell to transfer the standard out from the command on its left to the standard out to the right.
An alternative method to escape the pipe in Command Prompt is using the ^ carrot symbol. Similarly, a ` back tick may be used in PowerShell.
With help from the good folks at the Digital Forensics Discord Server, I manged to get the following commands to work.
#Command Prompt executing and imaging with XWF v20.8
xwforensics64.exe :2 "|e01|D:\testimage.e01|my description|derek" auto

#PowerShell executing and imaging with XWF v20.8
.\xwforensics64.exe :2 `|e01`|D:\testimage.e01`|"my description"`|"derek" auto
The commands for FTK Imager are nearly the same for Command Prompt and PowerShell. Please consider checking out Andrea Fortuna’s workflow here for more information.
#Command Prompt executing FTK Imager v3.1.1
ftkimager.exe \\.\PHYSICALDRIVE3 "D:\my test folder\testftk_CLI" --e01 --frag 1t --compress 9 --verify
Compare and Document
After acquiring the image, SMART information may be printed again to compare it to the drive’s SMART information before acquisition. The structure of smartctl’s default text output is expected to be consistent when comparing the same drive, so using the default text output or a JSON format is dependent on the process, tools available, and preference. Saving the output information as a JSON format, as opposed to pretty text, may be beneficial when integrating specific data fields with another program or script. I considered using JSON to programmatically highlight SMART information fields (e.g., Units Written and Write Commands) a specific color if they changed unexpectedly.
If saving the output in a JSON data format, note its encoding as it may affect a program or script’s ability to interpret it.
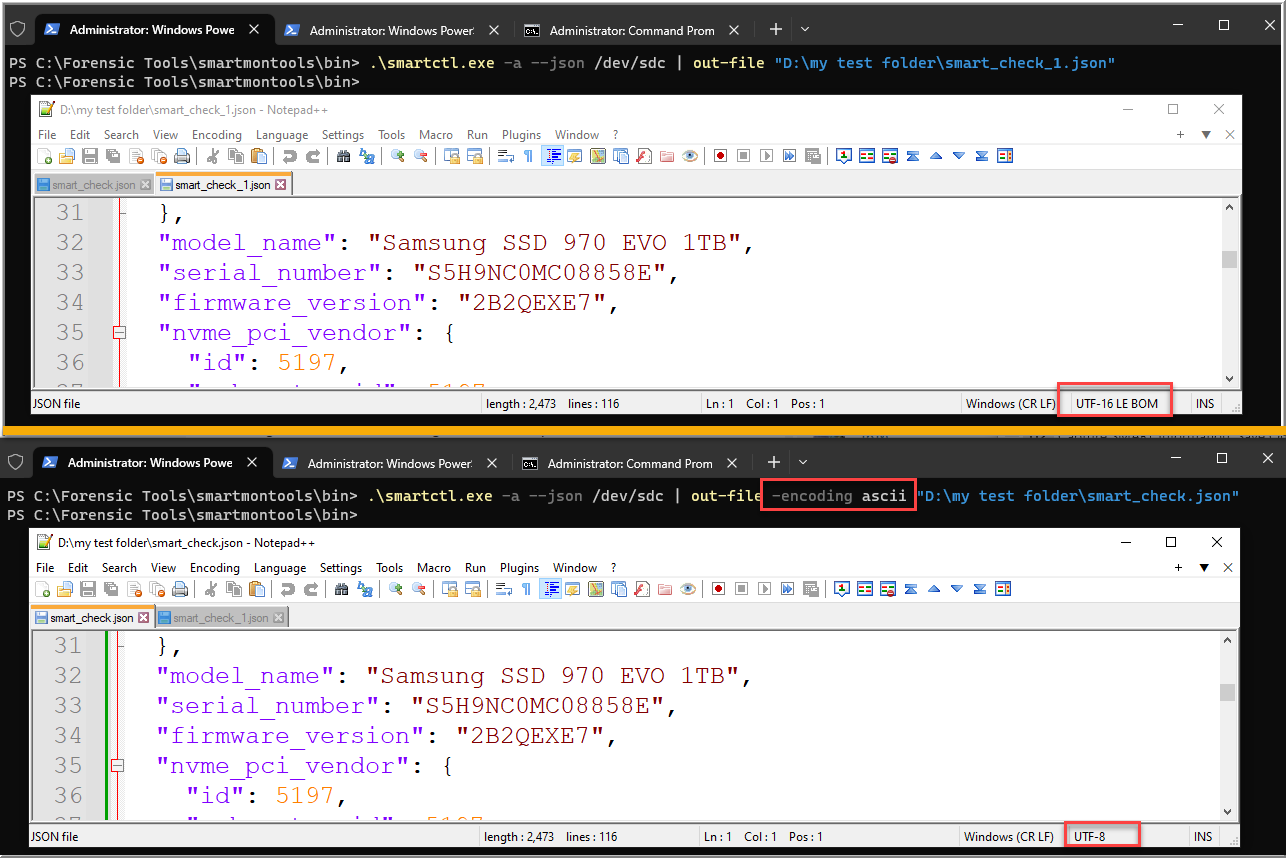
When redirecting the output to a text file with Command Prompt, encoding is expected to be UTF-8. However, the default encoding option for the PowerShell cmdlet, Out-File, may not. For example, the default encoding for out-file using PowerShell 5.1 is UTF-16 LE BOM. PowerShell 7.2 LTS uses UTF-8 with no BOM.
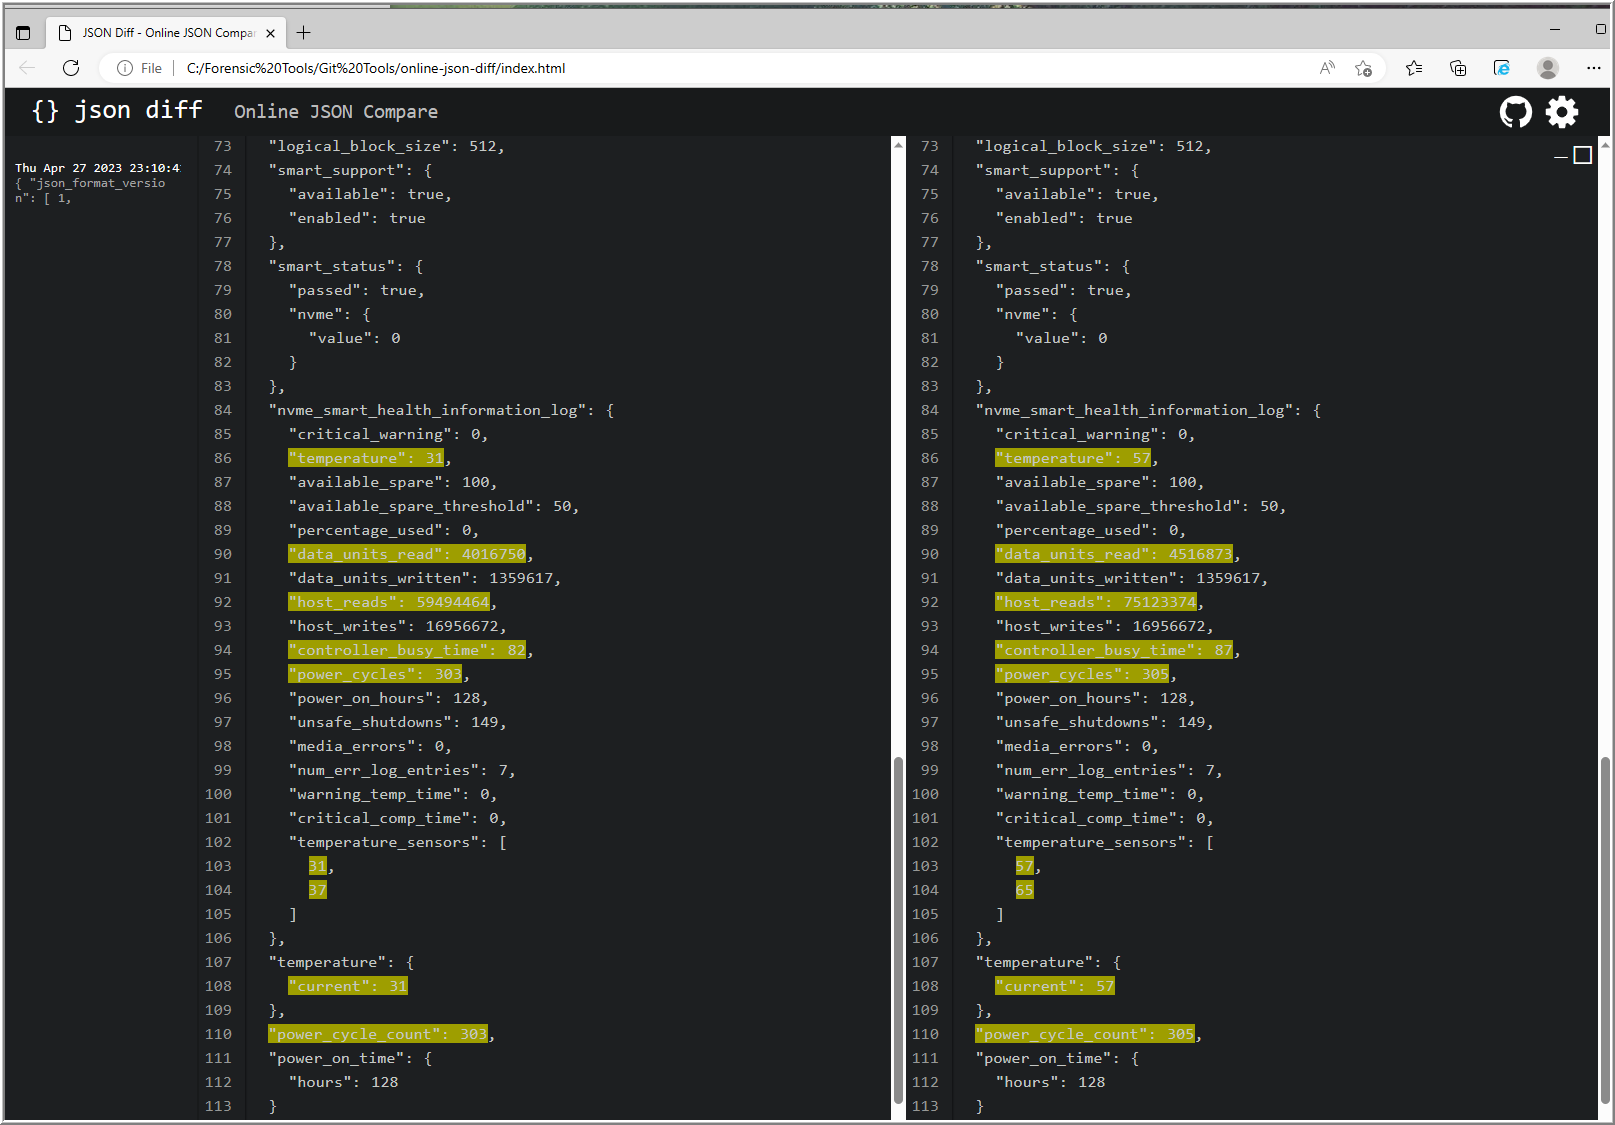
Comparing and Documenting with JSON Files
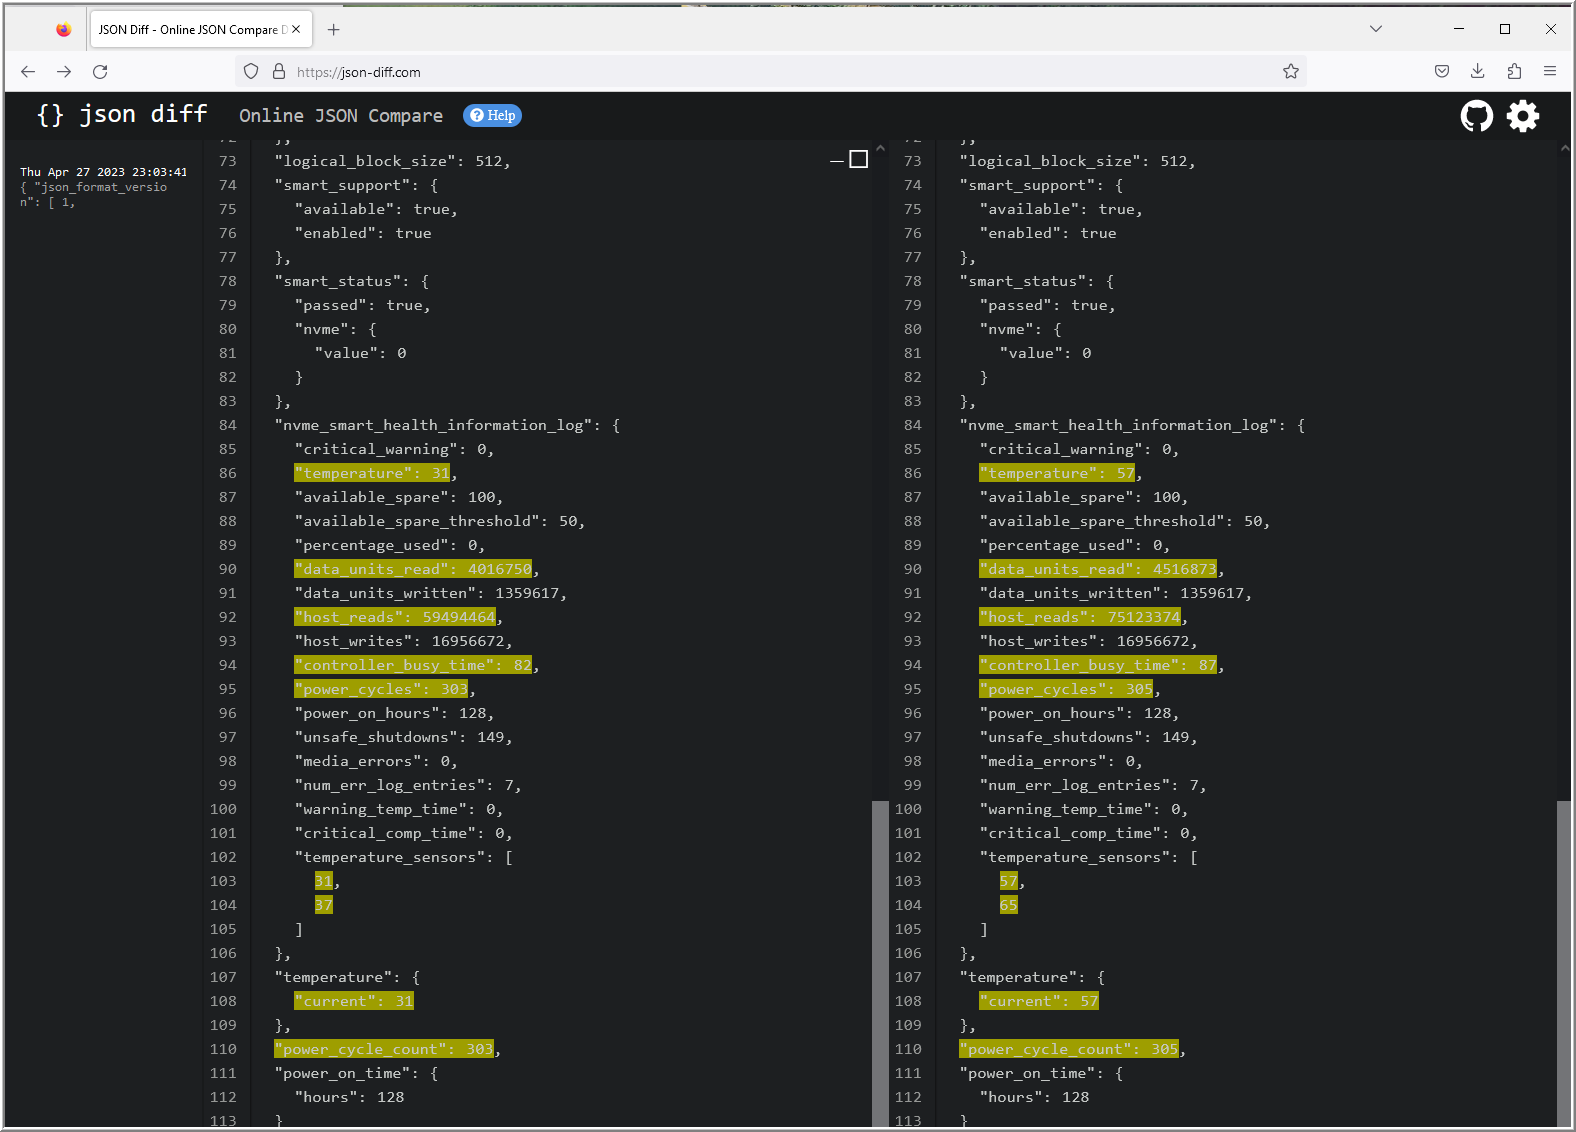
I found a handful of JSON compare tools. json-diff from blitlabs is one example that uses JavaScript. You can copy and paste the JSON strings to compare online, or locally.
JYCM is a python package from Sun Ao (aka eggachecat) that supports command line use. Be sure the data is encoded using UTF-8.
python -m jycm --show --left_file .\smart_before.json --right_file .\smart_after.json
After executing the command, it will display and highlight the differences between the two files in a web browser. While I imagine there is a way to change the output directory to save the HTML file, I have not explored this option any further, at this time.


Comparing and Documenting with Text Files
Compare or ComparePlus are plugins available in Notepad++ to quickly do as what they’re named after.

While I couldn’t find an immediate solution to run a comparison from the command line, I found something better – WinMerge. It’s feature rich, easy to use, has command line capabilities, and it’s free.
WinMergeU.exe "D:\smart_check_before.txt" "D:\smart_check_after.txt" -or "D:\smart_check_text_report.html"
The Batch Files
To efficiently execute these steps, I created two batch files: smart_imaging.bat and smart_imaging_config.bat.

smart_imaging_config.bat sets the paths to the programs I used. I imagined this is easier to manage than modifying the paths in the primary batch file.
smart_imaging.bat is the primary batch file and is executed from Command Prompt with administrator privileges. Administrator privileges are needed for smartctl.exe to properly read SMART information from a drive.
To use the script, execute Command Prompt with administrator privileges and change to the directory (cd) where the batch files are located. The batch file may be executed using the command:
start smart_imaging.bat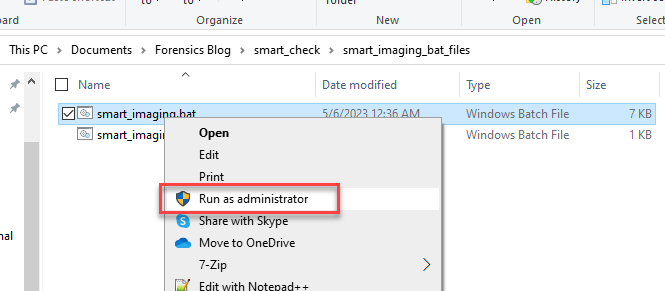
It will prompt for the following information: path to save SMART information, path and filename of the image, image format. It also prompts the examiner’s name and description to be included in the image file created by X-Ways Forensics.

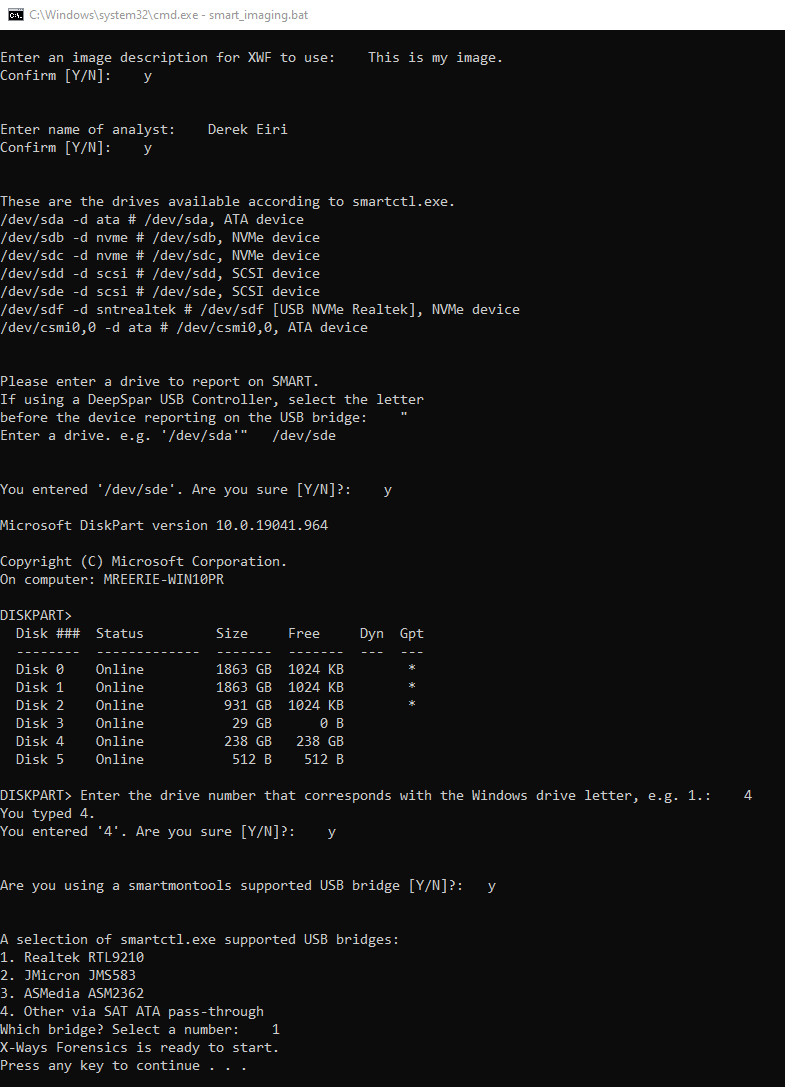
The script also lists disks, as reported by smartctl.exe and diskpart, to appropriately select the evidence drive to collect SMART information and acquire an image from. If a USB bridge is used, it supports smartctl.exe commands for select bridges based on smartmontools’ wiki for USB devices.
- Realtek RTL9210/1
- JMicron JMS583
- ASMedia ASM2362
- Various via SAT ATA pass-through 12

Summary
I considered how to collect and compare SMART information before and after a forensic acquisition of a drive using the DeepSpar USB Stabilizer. After assessing the steps necessary to achieve this, I identified tools that have command line capability to support it and created batch files to automate the following:
- Use examiner specified details and provide limited disk information
- Capture SMART information and output results to a text file before imaging
- Initiate the imaging process
- Capture SMART information and output results to a text file, again
- Compare the SMART information files, then save the result in an HTML report.
The batch files are an outcome of me learning about a process, breaking it down into steps, and finding a way execute on those steps automatically. Based on my testing, it is working as expected.
Replicating this process using PowerShell may be my next project. I already see an advantage of using the cmdlet, Get-Disk, over diskpart.
Do you have any batch or PowerShell tips? Considering sharing them with me!

Leave a comment